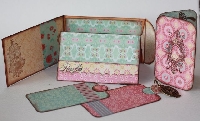
Coin Envelop Mini - Birds
Launch gallery slideshow

| Group: | Somerset Style |
| Swap Coordinator: | Camiliann (contact) |
| Swap categories: | |
| Number of people in swap: | 3 |
| Location: | International |
| Type: | Type 3: Package or craft |
| Last day to signup/drop: | April 30, 2013 |
| Date items must be sent by: | May 31, 2013 |
| Number of swap partners: | 1 |
| Description: | |
|
Hey Y'all. I just love coin envelops. I have created may different kinds of mini albums with them. They go great as a mini mini album in your larger mini albums, or in an art journal, the things you can make are endless. Here is a simple style using only TWO envelops. I made it in about an hour, so its simple and fun and I bet you ladies can come up with some elegant works of art. This months Theme Birds, or Birdcages, nests etc (No owls please that will be a future theme on its own) To see more photos check out my blog... requirement 1. So that we all receive the same type of project, requirement 1 for this project is to watch the link below and follow it. Please watch the whole video through (25 mins i know kinda long) there is a place where you need to do a couple steps out of order so that the brad prongs are covered inside the pocket, ( around mins 11-12) ALSO really important, DO NOT use her paper measurements... they do not work out so well. For example my fold out portion was 4 x 8 1/2...I would hate for you to cut your pretty paper too small, so please eye ball it or measure it yourself. requirement 2 Please use good quality double sided 3 different sheets ALL from one line of paper. I know this may sound picky but it will make your project look more cohesive. I only used 3 sheet of paper, In case you want to make yourself one, or are unsure of cutting paper, you can get a couple extra, with 3 different sheets you will show 6 different papers and have variety. No plain card stock on this project, IF the paper you choose is to thin, you may back it with card stock, like a mat, but beware that this will add, added bulk to the inside of the project. I used K& company on this one. WHEN choosing your paper keep in mind to choose paper with small or med designs, larger designed pattern paper will not look right on such a small project. requirement 3 in the video she makes a basic mini, I would like for us to bling out the front or chunk it up, add embellishments, dont forget to add something to the back, a stamp, ribbon, lace etc As for the inside, you can add anything you would like but REMEMBER it cant be toooo chuncky as it needs to close. I used washi tape and stamping, added layers of paper may work too. requirement 4 please sign your work on the back in pencil some where small. since this is a piece of artwork. requirement 5 these are to all be in a vintage style so that the collection matches and are senders choice as to interpretation of the theme. TIP - The video uses 3 diff kinds of glue... I love the AT gun, but the martha glue and accents both WILL warp your paper, I prefer to use Beacons 3-in-1 liquid glue or beacons fabri-tac ( lol they are the same thing) I have been using this for YEARS and nothing has fallen off any of my older projects. Please do not use glue sticks, or a tape runner, these types of adhesive will not hold up with all the pocket opening and pulling the tags out as this is a hands on item. you want it to be secure for life. I am sure that there will be more questions as we get into this project that i may have left off here. Since this form of a mini is diff than I have made before. I also want to make one once a month if we have the interest, future themes i have come up with are : Clocks, Owls, vintage 4th of july, Butterflies, Halloween, Christmas, Locks and keys, Hearts, Fairies, Music, postage stamps, sewing, flowers, school days,tea time ....If you have a theme you would like to see, just let me know. Please message me with Questions...as i am sure i have forgotten something... LOL No recent 1 or 3s. | |
Discussion
Leave a Comment
You must be logged in to leave a comment. Click here to log in.
- Info:
- Home
- |
- About
- |
- Forum Rules
- |
- Terms of Use
- |
- Press
- |
- Advertising
- |
- Blog
- |
- Graphics & Stuff
- Help:
- New User Info
- |
- FAQ
- |
- Group Info
- |
- Glossary
- |
- Forums
- |
- |
- Contact Admin

