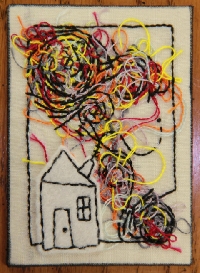
N&T: A Game of Catch ATC
Launch gallery slideshow

| Swap Coordinator: | LahDeeDah (contact) |
| Swap categories: | Embroidery |
| Number of people in swap: | 6 |
| Location: | International |
| Type: | Type 3: Package or craft |
| Last day to signup/drop: | September 10, 2019 |
| Date items must be sent by: | October 8, 2019 |
| Number of swap partners: | 1 |
| Description: | |
|
Even if you don't generally swap ATCs, I hope you'll accept this challenge. It's fun! Materials:
Set-Up: I begin with a 4-inch piece of fabric because that's what fits in my embroidery hoop and works for me. You can do what you want as long as you transform it into a standard (2.5" X 3.5") ATC in the end. Choose one color of embroidery floss to be your working thread. The working thread in the example is the black thread. Use one strand at a time cut to lengths that you can handle. Mine were about two-feet long. You'll also need a little pile of single-strand catch threads. They can be any color or combination of colors, but they should all be about one inch (2.5 cm) in length. These can be threads pulled from fabrics, snippets of floss, or a combination of both. Process: Poke the threaded needle up through the fabric from the back. Choose one catch thread. Lay it on the fabric beside the working thread. Poke the needle into the fabric beside the catch thread and pull it through to the back of the fabric so that the working thread traps the catch thread. What you have now is a short thread laying on top of the fabric with the long thread holding it down. From this point on, use backstitches, running stitches or a combination of both. Each time the needle passes from the front (top) of the fabric to the back, the working thread MUST trap a catch thread. If a catch thread you've already placed is in the path of the working thread, don't add another one. You'll trap that thread again. But if the working thread does not have a catch thread between itself and the fabric, you must place another catch thread on the fabric to be caught by the working thread. Once a catch thread is caught by the working thread, don't touch it again with your hand or manipulate it with the needle. In other words, the catch threads will do what they do on their own. Sometimes they stick to the working thread and form unexpected loops. Sometimes they pop up or bunch together. No matter how much they annoy you, let them do their thing. Continue this process moving the working thread around the fabric any way you want until you are satisfied with your piece. "Satisfied" may be a misleading word here because your piece will probably look like a terrible mess. This is where planning your embellishment saves the day. You can choose your embellishment in advance and work with it in mind or let the mess "speak" to you and figure out a way to answer it. :-) Attach your embellishment to give the ATC a focal point. You may also choose to add some finishing stitches (see the border made with working thread in the example), if you like. Cut it to size (or slightly larger if tucking or sewing it under). Mount it to an ATC backing (cardstock, felt, etc.). On the back, write, stitch or type the title, your username or the name you use when signing ATCs, and the general date you created the piece. Please remember to include the swap information in the package. Don't hesitate to ask questions if this swap is unclear or needs to be revised to make it more user-friendly. I always appreciate that! | |
Discussion
Leave a Comment
You must be logged in to leave a comment. Click here to log in.
- Info:
- Home
- |
- About
- |
- Forum Rules
- |
- Terms of Use
- |
- Press
- |
- Advertising
- |
- Blog
- |
- Graphics & Stuff
- Help:
- New User Info
- |
- FAQ
- |
- Group Info
- |
- Glossary
- |
- Forums
- |
- |
- Contact Admin

