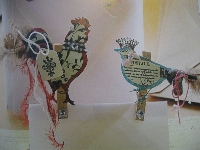
Pretty Bird Clothespins -- A Somerset Tutorial
Launch gallery slideshow

| Group: | Somerset Style |
| Swap Coordinator: | Tarabell150 (contact) |
| Swap categories: | |
| Number of people in swap: | 9 |
| Location: | International |
| Type: | Type 3: Package or craft |
| Last day to signup/drop: | March 29, 2010 |
| Date items must be sent by: | April 12, 2010 |
| Number of swap partners: | 1 |
| Description: | |
|
The idea for this swap is straight out of the Somerset Home 2009 issue. The creator, Tammy Lucik has a fun blog filled with inspiring ideas here. We will be making TWO birds and sending them to ONE partner. Directions: You will need to first get two wooden clothespins. Make sure that they are made with the metal spring in the middle. You will need to paint them with a thin layer of glitter glue just for some extra jazz. Next you will need to grab some paper, preferably a few sheets that are thick like cardstock. You will next need to either use a personal cutting machine to create a bird template or you may also find a bird template online or free hand it. It should roughly be about 2.5"x5". After you have made your template next you will trace it onto two different sheets of paper. Since this will be the background shape, the paper should be thicker, cardstock will work as a backing. If you use plain paper, either paint it or stamp on it. After this is complete you will need to cut out two more shapes of the bird, but this time the shape will need to be a bit smaller, so that you can see the background bird around the outer edges of the smaller bird. Glue the smaller bird onto the larger bird using a glue stick and let dry. After the two birds are dry, now it is time to embellish and decorate them. The options are really endless of what you can do but some suggestions of things you can use are ribbon, rickrack, lace, charms, buttons, glitter, stamps, rhinestones, embroidery thread, feathers, tags, fibers, and so on. Before you glue the birds to the clothespins, you may add a small button or rhinestone down on the bottom of it just for an extra embellishment. Now it is time to glue the two birds to the two clothespins with liquid glue. Let dry and you are done! Really let your creative juices flow on this since there are so many options. I will leave this as senders choice due to the nature of the items people have at home since this is a great time to use up those bits of pretty little usable items but you are more than welcome to check out your partners profile for ideas. Please ask any questions you may have and just have a good time making these :o) | |
Discussion
Leave a Comment
You must be logged in to leave a comment. Click here to log in.
- Info:
- Home
- |
- About
- |
- Forum Rules
- |
- Terms of Use
- |
- Press
- |
- Advertising
- |
- Blog
- |
- Graphics & Stuff
- Help:
- New User Info
- |
- FAQ
- |
- Group Info
- |
- Glossary
- |
- Forums
- |
- |
- Contact Admin

