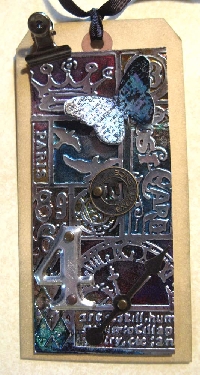
TH Technique Swap #2 - Embossed Flashing Tape
Launch gallery slideshow

| Group: | Tim Holtz Addicts |
| Swap Coordinator: | dobie256 (contact) |
| Swap categories: | Art Artist Trading Card (ATC) Handmade |
| Number of people in swap: | 9 |
| Location: | International |
| Type: | Type 3: Package or craft |
| Rating requirement: | 4.80 |
| Last day to signup/drop: | April 22, 2011 |
| Date items must be sent by: | May 13, 2011 |
| Number of swap partners: | 2 |
| Description: | |
|
I am starting a series of Tim Holtz inspired technique swaps. While I appreciate his urban/grunge/vintage artwork, my style tends to lean more towards nature/clean/modern designs. But, I still love Tim Holtz products -- they are excellent for all types and styles of artwork! With that in mind, my swaps, at least for now, will concentrate on technique instead of style. I was lucky enough to take a class with Tim last spring at the Mega Meet in Novi, MI. I made three tags. I will use these tags as inspiration for the first three technique swaps. You will be making one ATC for each of two partners (2 ATCs total). ATCs are 2.5 x 3.5" in size. Embossed Flashing Tape You can find flashing tape at big hardware stores or home improvement stores. It is used to seal ductwork for heating and air-conditioning. It is NOT the same thing as duct tape! It is very shiny, a bit pricey, and the roll I found was exactly 2.5" wide. If you absolutely can't find this tape, I have done this technique on aluminum foil, and know people who have done similar work using an aluminum can. But the effect using these metals will not be the same as with flashing tape. We used flashing tape in the class that Tim Holtz taught. Step 1: Carefully apply the tape to a piece of heavy cardstock a manilla tag. Trim to 2.5 x 3.5" in size. Run this card through your embossing machine using the embossing folder of your choice. Hint: Use a folder with lots of detail and raised areas -- NOT one with big blank areas! Step 2: Color the card using alcohol inks. Hint: Bright colors work the best. Actually drop the color onto the metal, you want a nice vivid coating. You can change your mind as you create -- the last color dropped on the metal will be the color that shows. Step 3: Let the alcohol inks thoroughly dry. Then, WITH A VERY LIGHT TOUCH, rub the raised areas of your card with archival ink (we used black in class). Carefully wipe this ink off with a dry paper towels (or small sponge or Q-tips). You should have a bit of antiquing on the colored areas and the silver foil should now be a light pewter color. You can do the archival ink step again if you like a darker effect. Just be careful not too rub off too much of your color (if this happens, reapply alcohol ink, let dry, and try again with a light touch!) Step 4: Embellish your ATC or tag (optional, but this technique is really enhanced with some metal embellishments, or fragment charms.) This is a somewhat tricky technique and I was unable to find a video tutorial for it. It is also NOT in his most recent book. Tim did something similar on one of the Christmas tags, but he used entirely different supplies. This was the technique he taught in class. Flashing tape tag detail pictures: Here is a close-up of this technique on an ATC I save all of my scraps for other projects! Method using aluminum foil base You can see the color a bit more -- I used bright alcohol inks on aluminum foil Have fun and feel free to PM me with an questions or concerns. | |
Discussion
Leave a Comment
You must be logged in to leave a comment. Click here to log in.
- Info:
- Home
- |
- About
- |
- Forum Rules
- |
- Terms of Use
- |
- Press
- |
- Advertising
- |
- Blog
- |
- Graphics & Stuff
- Help:
- New User Info
- |
- FAQ
- |
- Group Info
- |
- Glossary
- |
- Forums
- |
- |
- Contact Admin

